the years I have fine-tuned my own warp winding techniques and I'd like to share some of those
with you. Winding a warp is easy, it's satisfying, it's one of the things that we teach and have really not changed over the years. First thing we want to think about is where do we put a warping
board.
If you can't make holes in your walls, a really useful thing are these plastic hanging
hooks that can go on your wall and come off without leaving any marks. Another way you
can use your warping board is to if you've got a high castle loom, you can hang
it from the side of the loom. One of our staff people has neither accessible walls or a high
castle loom. What she does is lean her warping board against a couple of chairs and she sits
on a chest that's very nearby and winds her warp.
And if all else fails, you can of course
put the warping board flat on a table. If you are selecting a new warping board,
you want to be aware of the characteristics. They must be sturdy, you must have a way to
tighten them. This board connects with a bolt and in the back of it is a barrel nut and
from time to time, you tighten it.
You want your pegs to be spaced far enough apart so
that you don't skin your knuckles as you're winding your warp. You want them to be very
firmly set and you want them to stay that way. All warping boards are approximately 36 inches
from side to side which enables you to keep track of how many yards you're warping. Now let's get started winding a warp.
My warp
is 8/4 cotton carpet warp and for awhile, this guy can stand flat on the floor but very
soon, it's going to be too skinny to stand up on its own. In the store, I use a shopping
cart and a dowel. At home, I use a shoebox with holes punched in the sides and a knitting
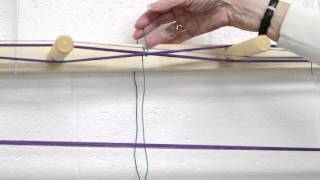
needle. We get started winding the warp with a loop and an overhand knot.
We want this
to be secure so that it doesn't slide and mess up the tension. I'm going to put my loop
on the first peg, and I'm going to make a cross on these two pegs. This is going to
be a three yard warp. So from here to here is essentially a yard.
And then I'm going
to go to my second peg and my third peg. And so we have one-two-three yards. Now why am
I skipping pegs? Basically just because I. Can.
It's a little more comfortable. If I
happen to be winding a long warp I would use all my pegs. And now we're on the way back.
And I go to peg two, and to peg one, and where in the beginning I went over and under the
cross pegs, now I'm going over and under the cross pegs. I like to keep things even and
keep track of where I am by telling myself that on the way down I go over the pegs, and
on the way back I go under the pegs.
I also count to myself just about nonstop. So I would
now be saying five-five-five.
From time to time I push the warp back on the pegs but I don't ever consciously overlap.
This is
six-six-six. I'm aiming for twelve and an inch.
This is seven-seven-seven, eight-eight-eight. And as I wind, I pull up
on the yarn so that there is not a whole lot of tension on the yarn. I'll show when we
have more wound, I'll show you the amount of bounce in my warps. If as I go along, I
forget to keep track, I stop and I count.
And I've got two-four-six-eight-ten ends wound.
I'm on my way to twelve so I will keep going. I go over and under, and this is eleven. When
I get to the starting peg I'm going to stop for a minute and you can't lose your tension
because then your warp will run away. And I'm going to get my counting thread.
Counting
thread is just a piece of string that lets us keep track of our inches and I know that
I've got twelve ends locked in here. I don't have to count them again. One-two-and I just
had a knot crop up. I'm going to wind back to the beginning peg and wrap around the pegs
so it can't go anywhere.
Cut the knot out and take the warp back to a few inches beyond
the beginning peg and make that broken part go away. And now I'll take the warp end from
the two and join it to the part that's on the warping board with an overhand knot. You
want to keep the tension on the warp as much as you can. It's okay for the knot to go in
this section because this part of the warp will be at the back of the loom, and will
never get a chance to weave or to go through your heddles.
Eight-eight-nine-nine-ten-eleven-twelve.
When I get back to the beginning peg, I'm going to wrap around the pegs a little bit.
I'm going to drop my counting thread so that the end that's now hanging in back of the
warping board comes forward and the end that dropped down is going to go in back. I now
have two inches of warp locked into the counting thread. I've counted them twice, they're not
going anywhere, I don't need to count them again. We've got our warp wound, we can count
and see that there are 1-2-3-4-5-6-7-8 inches, all twelve ends in each bout, secure in the
counting thread.
And so now I'm going to tie the counting thread in a bow, not very tightly.
You see how much tension I don't have on my warp. It bounces. We're not making a bed in
the army, we don't have to drop a dime on it, it wants to be even, it doesn't want to
be sloppy, but it doesn't need to be tight. I've cut eight or nine threads about fifteen
inches long, and we're going to secure this warp--we don't want it to get disturbed in
any way.
The first thing that I tie are the four sides of the cross. And I tie on the
other side of the cross, in a bow. On the other side of the cross peg. Your lease sticks
ultimately will go into this space, but for now we'll keep the cross secure with
the ties.
And next I'm going to tie what we
call the choke, just beyond the cross, one more tie so that when we're dressing the loom if we make any kind of mess, it can't get into the body of the warp because we won't
be untying that for awhile. Then I go back and I tie at the beginning of the warp, and
then I go down to the end of the warp and I catch the loop end of the warp which will
ultimately be the ends that you thread. Going from the choke to the end of the warp, too
much warp has too much freedom. So another tie here--I like my ties to be three-quarters
of a yard to a yard apart.
Another tie here. Three yard warp, tied to within an inch of
its life, and it is secure and we can take it off the warping board. Unless you're going
directly to the loom, it's a good idea to chain the warp. So we pull it off at the end
opposite the cross.
We make a slip knot, a loose one, and then we reach through and pull
some more, and we reach through and pull some more, and a little bit more. And then we get
the beginning end of the warp and we put them together and we take the last cord and we
make a very loose--I call it a hanging cord. Just something that keeps the whole warp compact
and ready to go to the loom when we're ready to dress the loom..
No comments:
Post a Comment