This is available on the ball bands for Caron Cotton Cakes. And this is also printable here on yarnspirations.Com. I'll provide a link in the more information of this video. So today I'm gonna show you how to get started.
This is probably one of the simplest bags I've ever seen. It's only one page up for the pattern. That's how simple is and once you understand how it's gonna grow and then how it builds up to the side then you're good to go. So without further ado let's decipher the pattern even more.
So in the pattern we're gonna start off on round number one and we're gonna go all the way to number five and then it says continue as established increasing six single crochet each round until there's 126 single crochets. So up here you see my notes. So the next round after number five is 36 stitches 42, 48, 54 and so on. So these are the amount of rounds you need to do that does the increasing in order to get to the base.
Once you get to that point then you're gonna join me back in the video and we're gonna work our way up. So what I'm gonna do is that I'm gonna show you that sample now and we're gonna pick up in that point in a moment. So here's what the base looks like. It's a round circle and you will see that it's kinda bowling in and it's really quite awesome and it's really easy to be able to follow this.
So there's six pieces of the pie. So there's 1, 2, 3, 4, 5 and 6 and there's an incremental increase. Now I decided not to do any stitch uh, slip stitching between each of the rounds and what I did is that I used a stitch marker just to trace my way up so when I knew that I was around that I would then progress to the nets, next set of instructions. So you will see here there's no slip stitching involved and I'm going in a continuous revolution.
Now this is me improvising from the pattern in order to do so. I don't like slip stitching marks and so this is a good way to do it. And once I'm done I can pull this out. So what I want to show you is how to grow this incrementally and then I'm gonna leave all this to grow and this here is starting in the main section and once you get all of that done to 126 stitches this is what you see here before continuing into the next part.
To do this pattern you need a size 'F' a 3.75 Mm crochet hook. I don't have that so I'm using the next size up, 4 mm size 'G' in order to do that. You're also gonna need a spare piece of string. If you would like to do a continuous round just get a spare piece and we're gonna be using that as a stitch marker.
So let's begin now round number one. Let's begin round number one by creating a slipknot and this is a easy level project. So it's pretty simple. Get a slipknot going and put it on to your hook.
I want you to chain two, so 1 and 2. Now second chain from the hook the very beginning one I want you to put in six single crochets and let's count those so together. So 1, and 2 and this is 3, I'm going around in a circle, 4, 5, and 6 and before you go any further I want you to get that spare piece of string just pull up a loop, get the spare piece of string and just from the back side from the front, uh, to the front just put this strand through and that represents the ending of a round. You're gonna move this strand up every time you're progressing around so that you can keep track of it.
Because what I'm gonna have you do is do a continuous around so that we don't have any slip stitching at the end. So let's progress into round number two. So round number two each one of these stitches that you have, there's the total of six, so 1, 2, 3, 4, 5 and 6. So if you're not sure just count it backward from behind the hook.
So 1, 2, 3, 4, 5 and 6. So the 6th one back or the very starting if you can see it depending on how new you are you're going to apply two single crochets into each one of the stitches. So 1 and 2 and then go to the next one, 1 and 2. So we're making our pie shapes as we're going.
So we're now establishing because there were six stitches to start there's gonna be six pieces of the pie and you're essentially putting in two single crochets into each piece of the pie at this moment. You will come into the very last stitch which is the one with the stitch marker and you will put in your two single crochets, but before you progress any further I want you to insert your hook into the stitch right underneath it and just pull that strand so that it just goes through it and that represents that you just went around. So round number three. So we're gonna do a continuous increase all the way to 126.
So the next stitch will always be after there, you're finished. It's gonna be two single crochets. Now this time there's gonna be one in the next one and then the next one has two. The next one has one and the next one has two.
One the next one has two, and one, the next one has two and one, next one has two. And if your math is done, right the very last stitch would just be one single crochet by itself. Just gotta finish the second one for that one. So that where it is, where its marked that's the last one and this one happens to be one by itself.
It'll always be a solo by itself at the very end of a round. Just grab the stitch marker and pull it through. So the last time we just did is that there was two in the first one which there's gonna always be for the growth of this. So there will be two into the first one and now this time there's going to be two in a row that are by themselves.
So 1 and 2 by itself. Okay, the next one has two in the same one. So put 1 and 2 into the same and then the next two are one by itself. Okay two in the next and then one in the next two.
Okay, two in the next and one in the next two. You keep doing that all the way around. Okay, so this one here is two into the same one and then the final two that you see are just one and one by itself. So the progressive increase is going to be adding more and more into each of the pie shapes.
In time you will see the pie shapes actually forming and you'll be able to see where it is. So do you see those two? The very first one will always have two in there. So it's rotate it around. See how these two are in the same one the very first one of that two will have two in it.
So you can stop counting if you feel comfortable and can see it. See there's two there. The first one will always have two. So let's prove that.
So in the next round, let's go we're gonna go two into the same one, which is the first one of the grouping of two and now it's gonna be three in a row, but you can actually physically see it. So you're gonna go 1, 2 and 3 by itself, but do you see that there's two? It's the first one that's gonna get two. If you can physically see that you're good. You don't really need to count too much because honestly I didn't and I just kind of checked it off on my list as they went around it.
So the next one has two in it because I can see and also I mentally counted to three and you're just gonna continue to do that all the way around. So what I want you to do is that I want you to continuously increase by adding one extra stitch in between all of the grouping of twos that you have. So the next one is two into the next one. Notice, I wasn't counting.
I'm looking where those stitches are. But what I have done in my sheet is that I provided you the number just in case you need to count for yourself in order to keep yourself clear. So there's two into the next one and then the next three are by themselves. Okay, there's another group of two here.
So that must be two into the first one and look at that the final three that you have here is going to be one into each and then that's it. So grabbing that stitch marker pull it up and then you can mark that. So what I wanna do is that I'm gonna leave the growth for you to get to yourself to 126. Let me pull my sheet back.
So what I've done for you now is that I've got you to round number five. You see that there was two into the first one and then one single crochet in each of the next three which is what we just did. So what I want you to do is you can take a screen shot of this right here if you can see it and you will see that the next round here next, next, next all the way down all of these are the rounds. So there was 36 stitches and there's gonna be four by itself.
Forty two stitches and there's five by itself and six and seven and you can see that all the way until you to get to the number 19 which will take you to a hundred and 126 stitches. I want you to continue now to increase and get yourself all the way to 126 stitches and then we're gonna start the main body section which will be next in this tutorial. So when I last left you, you were doing here and you were just increasing and eventually you'll get yourself out to here if you're increasing incrementally and keeping it with your increases as you see. So what we want to do now is that we're gonna move on to the main body of it.
So what we have to do is that we have to increase by four stitches and it says equally around. So this means that when it says equally that the mathematics won't work out. So what they're telling you just eye it up equally. So what we can do is that we can add in two stitches right at the very beginning of a round.
We're still gonna do a continuous revolution and what I would do is kinda make it like a clock. So at nine o'clock here just roughly guess a stitch that looks right and put a stitch marker there and that's just a spare piece of string and then come down to your six o'clock position and what we're doing is that we're marking it and so we can put two single crochets into the same one. And then roughly around the three o'clock position here. So when we hit those we're gonna put two single crochets into each of those and what we're trying to do is get ourselves to 130 stitches itself.
So what I want to do is that we're going to do half double crochets but we're gonna work in the back loops only to create the bottom shape of the bag. So let's begin to do that. So in the pattern if you're doing the slip stitching you'll have to chain two and then begin your round. But if you're gonna start like me I'm gonna go in a continuous around in the next one what I want to do is in the back loops only for the entire round that we're going to create half double crochets.
So just immediately wrap the hook and going into the next one and we're going to put in two half double crochets in there. This is the 12 o'clock position to get myself to have those equally, um, increasing rounds. So the next, all of the next ones in the back loop only are just gonna be half double crochets working ourself around. And what you wanna do is that when you hit the nine o'clock position over here I want you to put two into there and then six o'clock two and that's three o'clock two and then come all the way back up and what I want you to do then at that point is move up that stitch marker.
You can physically see where you put in your half double crochets. So just get your stitch marker and keep it up and what we're gonna do is then we're gonna go into continuous around from that particular point. So just work your way, half double crochets in each stitch all the way around except for the nine o'clock, six o'clock and 3 o'clock positions. So now I'm just coming all the way back around.
I can tell by this and I wanna leave this here because I'm gonna use that as my measuring tool. So to start the next round. So rounds number 2 all the way to 39 is just one half double crochet now into each one of the regular stitches. So we're no longer working in the back loops.
We're just continuing then in the regular stitches. So what I want you to do is all the way now rounds number 2 through 39 in order to get that done. So you can either count it, but I wouldn't because simply you can see when there's a round. So there's 1 and then 2 and then you and continue.
So what I'm gonna do is I'm gonna get my rounds done off-camera. I'm gonna go back and watch some TV and then when I come back I'll be up number 29 for you, show you how to finish off and then we'll start reviewing the straps. So now I'm back in real time. I started this yesterday afternoon and now this is like 8 o'clock in the morning the next morning.
So this is something I worked on it in the evening in order to get myself all the way from the bottom to the top. You'll notice that there's no slip stitching and this was the actual if you follow it from the bottom. See how it comes up? This was at the general area. So what I did is that this is all I have left of my Caron Cotton Cake.
So you're thinking yourself, you still have the straps. Well, technically the straps are already done. So for those that are new to crochet when you change your crochet hook in order to be able to do something like this is that if you change it bigger you're going to use more yarn. So I knew that.
So what I wanted to do is that I got myself all the way to here. So this was round number 35 and what I did is that on the other side of the yarn ball. I used the outside strand to make the straps. The reason why I did that is that I can judge this better because if you go all the way to 39 and you've increased your hook you may actually run out of yarn in order for you to finish and then have to crack open a fourth ball.
So this is just a neat idea. So for those that are just finishing up now, um, so this is technically round 37. So I never got all the way to 39. So I just don't feel like I have enough to in order to do any more rounds with this.
So if you did it as a continuous around what I want you to do is that we're still still doing your half double crochets but what I want you to do then and this is and add, this is not in the pattern. I want you then to do two single crochets, 1 and 2 and one slip stitch. And what that will do is that it'll put a backhand balance to be more of a flat area as it comes all the way around. So now we're gonna move on to the final border going all the way around this and we're gonna do the reverse single crochet also known as the crab stitch.
To do the crab stitch it's actually a reverse single crochet and what we're going to do is that we're gonna come and go in the opposite direction from which we came. We're gonna crochet it backwards. So it's not about turning the work it's about actually doing reverse single crochet. So in the same one, same stitch, I want you to, uh, just go right into it and pull a loop and I want you just to pull through the two strands.
Okay, so I want you now go to the one right behind it. So usually we're always progressing forward. Go into the one right behind it. Go right in grab the yarn, pull through you have two strands again pull through both.
So then go behind and keep doing that all the way across this is called reverse single crochet and after about four stitches you're gonna start seeing the action of what you're doing. You're creating a nice finished look at the top of your bag. Okay, so it almost looks like rope when you go to do that. So what I want you to do is single crochet, reverse single crochet yourself all the way around and I'll meet you at the end of this round.
So I'm coming all the way back around of course going backwards and we're just gonna go into your very last one where we started and what I want you to do is I want you to concentrate on making this the best you possibly can. So just, just make an extra long yarn tail and we're gonna use a darning needle to be able to make it look like it belongs. So we're just gonna pull that strand through. Now take this yarn strand and throw it onto a darning needle.
I don't know why I call it darning needle. I've always have. It's a tapestry needle. This one here with the bend in it is actually a leather needle and that people ask me about that all the time.
So what you wanna do is that you want to go in the direction that you were still going in and I want you just to sink it in and take it to the back side meaning to the inside of the bag and if you pull it nicely it'll look like it belongs there. See? Isn't that awesome? So then just turn it to the back side and then just come in at different strands. So the the first time we went through was number 1, this is number 2 and finally back on the other direction through a different path for number 3. So what we're going to do then is that once you get that done just make sure you weave in all your ends.
You had a total three yarn balls and if you had any knots you would have had to deal with that as well. I did have three knots in the balls other than the ends so big deal, you know fixed it. It looks great. So now we have the top done and now we're going to move on to the handles.
So let's take a look at your handles. You need to make two of them and I do have two of them and what this is is single crochet. There's five rows back and forth and then what you're going to do is peel it or sorry, you're gonna fold it and then you're going to single crochet the two edges together to create the handle. You're gonna need to do two of these.
Now when you go to start this leave an extra long yarn tail and you're gonna use that to sew it to the bag and then when you finish off you happen to finish up on the other side and you're going to leave the yarn tail for that as well, and you're going to use that to be able to do it. So you need a total of two of these which I have and I'm going to show you just a mini sample what you need to do and then you can get that done and place it onto your bag. So let's begin to do our handles and you're going to start off with a slipknot. So do an extra long yarn tail and then you can use that to sew in later.
So it's already attached to your handle so it makes it easier. And what you need to do is that you need to chain a total of 100. I'm only gonna do ten. So 1, 2, 3, 4, 5, 6, 7, 8, 9,10.
You're gonna go all the way to 100 and then you're going to follow the next part of the instruction. So once you have a 100 you wanna do second chain from the hook, turn it over and get the back hump of the chain only and you're going to single crochet yourself on the back hump all the way back across. So each chain is gonna have one single crochet. So this is row number one of five that you need to do.
So you're just gonna single crochet yourself across and let me get there in just a moment. So getting across the chain takes a little bit more time than normal because it's brand new. It's a new project in your hand really and does so you just have to figure out how to hold it the best. So stay on that back hump and then you end up with a perfect edge on both sides, which is what you're looking, what your goal should be.
So once you get to all the way to the edge, turn your work and then you're going to chain one and do one single crochet in each of the stitches going back all the way across. So this is row number two. So when you get to the other side turn it again and then chain up one and single crochet across. You wanna do it so that you can see five rows or you can count them on your paper.
So 1 and 2. So what I want you to do is go back and forth a total of five times and then see me back here in just a moment. So eventually you're going to have five rows. Of course, you're gonna have a much bigger handle.
So what you wanna do then is now that you got your five rows is done you happen to be on the same side that the starting strand is on. So what I want you to do is just simply just fold it up. Okay, so watch how I'm doing it. I'm folding it up like this and I want you to match the stitches across.
So just fold it in a way. So keep that yarn, darning needle or that starting strand out of the way cuz you want to use that to sew. Okay, so keep it in front and directly go across into the first stitch on the, on the other side and come into the same stitch on the other side there and single crochet. So once you start that you simply go into one side okay, and then you go into the other and what you're doing is you're permanently creating a fold and so you're just going to match all your stitches all the way to the end of your 100 actually, it's 99 because you want a second chain than the hook.
So you have 99 stitches. You're just gonna single crochet yourself and it's gonna create the permanent fold in your handle which gives it strength. So you wanna keep an eye making sure your stitches match each other as you're going all the way across. So just kind of eye it up into the future just in case you're off by one or two it does happen.
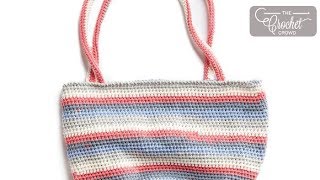
We get distracted with TV and then you're gonna eventually come right into the end Which I'm about to do. So once you get all the way to the end keep an extra long yarn tail and you're gonna use that side to be able to sew into the bag. So once you have that done just pull the loop through and just put it aside and make sure you do two of your handles and let me just zoom out here and so you have two handles that you will have like this and so you now you have your, your strands and now we're gonna look at the photo and see where we need to put them on to the bag. So now looking at the photo you can just roughly see where things are going to line up here.
So it looks like it's just like, let me just count, 1, 2. It's about ten stitches from the edge and of course you can change where those are as well. So what I want to do is grab up my bag and then what I'm gonna do is that I have four leftover yarn strands and I'm going to tie the handles into position just with the bowties so that it will hold and then I'm gonna sew. So at this point I have no stitch seam lines at all because I went in a continuous round.
So no matter how you turn this thing you don't see anything. So what you wanna do is that you wanna look at that top edge and you were going to place in your first handle. So I'm just gonna roughly count out ten. I wanna just see where it is.
So 1, 2, 3, 4, 5, 6, 7, 8, 9 and 10. So I think it should be more than that. So 1, 2, 3, 4, 5 so about here. So what I'm gonna do is that I'm going to just put my yarn strand that I have here and I'm gonna pull that through and that will hold that into position as I go and I wanna put my one handle, so I'm going to put when I.
Go to do this I'm gonna put that seam line that we did the last one on the inside of the bag. So just reaching through the project, grab that blue strand pull it through and all I'm just gonna do is just tie it together with a bowtie so that I can release it later if I want to. So what I would do because it is folded in half equally, I would just peel this back and place the other one on the other one in the back at the same position. So just follow it straight back and then grab your other one that you have.
So when you go to sew this you've gotta be very conscientious of where that seam line is that you did that last single crochet. Just pull, just go in pull the blue through. Keeping my seam or keeping all my strands in position. And then tie that with the bowtie.
So now let's go to the other side. So if you had a measuring tape, which I kinda don't have one here off camera. So what I'm gonna do is that I'm just gonna eye it up and count where that is. So 1, 2, 3, 4, 5, 6, 7, 8, 9, 10, 11, 12, 13, 14, 15, 16 and 17.
So from the fold that I can see there 17. So let's do that from the fold. So I'm gonna not count that one. So 1, 2, 3, 4, 5, 6, 7, 8, 9, 10, 11, 12, 13, 14, 15, 16 and 17.
So 17 right there and then just grabbing a spare piece of string. So I'm just gonna use something. So my hands kind of splayed out nicely. I think I'm just gonna move one over.
Pull my strand through and what I'm gonna do with this side is that I'm gonna take this and make sure that, actually, I'm gonna do the back one too while I'm here. So just pull through and through. So when I go to do this, I wanna make sure that this stays on the inside, my yarn strand. So now I'm ready to sew down.
So I'm following the inside seam. So this one's not so important because it's my very first one and then I have to make sure that the next one makes sure there's no twists in the handle. So what I'm going to do is that I'm going to attach the handle with the whip stitch. Okay, and don't be cheap about this whip stitch either because obviously all the pressure is gonna be on here.
So leaving that bowtie in there for a few more moments. I want to just going around okay, and what I want you to do is just grab some fibers on this side. You should not see this needle impeding to the outside of the work on the other side. Okay, so just say, stay to the fibers.
Okay, and just go into your, your handle and pull through. Now, now that I've done that I can get rid of this holder. And now just moving along so just grabbing some more fibers and going into the handle again. So this is called a whip stitch that I'm doing right now, and it's attaching everything and if you stay to the inside fibers you don't see this joining strand on the other side.
And what I mean by don't be cheap about it like just don't just do a couple of attaching a couple whip stitches and be done with it. Make sure that you really give it some durability and strength by putting lots in. So once you go across once just pull everything nice and tight. One thing I like about cotton is that it has strength and durability.
So you really can hold the weight. So what I'm doing is that I'm just getting rid of any extra flak or slack. Mm-hmm Cuz, if I don't then I'm gonna have some flak. So I guess my lesson here is that I, when I go to pull it I want to make sure I'm tight.
So now I'm gonna go across again. So staying to the inside of the fiber. So I'm gonna go back in the other direction. Okay, so now that I've gone across and back I'm done.
So what I want to do is that I want to apply a tie here. So I'm just gonna go into some fibers here on this side, but I'm going to loop it through to create that tie and then I want you to go back and forth the total of three times. Kinda like how I showed you how to fasten off before. So just going into the fiber work.
So 1, through a slightly different path for 2. If you go in the same path, obviously, if you're in the same path, then that yarn will fall out. So you wanna go in a different path to catch different fibers. It helps get that into position.
And I can go 3 and then you're done. So you wanna make sure, it kinda looks like it's not attached there is it. So what I'm gonna do is that I'm just gonna come over and just get that last section in. So it's good to reevaluate your work, you know, that looks better.
And now I can just simply go back and forth again three times in order to hide in those loose ends. So once you have everything secured in just simply just cut down and then if you wanna take a look at the back before you you get that far, you can do that. So what you wanna do is that you wanna come back and let me just back out so you're going to just follow this seam line, the inside make sure this handles not twisted and then comes back down and then make sure it stays on the inside and therefore you can see it. So there's a next strand that you have attached is at the base of that.
So what I want you to do is attach all of your handles now. So I'm about to give you a piece of advice that I. Just noticed. So that if I were you and you were me.
This is what I would do. So I started doing this one and then I realized that I'm looking at the outside of the bag and I'm ruining it because on this side I stayed on the inside therefore that you don't impact the outside look. So what I want to do is that I'm going to turn the bag over. So I was originally just gonna let you figure that out on your own.
But I'm not going to now. So I'm gonna turn the bag over. So these are the sides that are already attached here. So what I want to do is peel that back here and so when I go to attach then these here, I want to stay and favor the inside of the bag to be able to do the attaching like I did with here.
So it's the easiest way to be able to turn it around. So do that and I'll see you back here in a moment. So this is my bag. Everything is now attached.
Look at that. That's all the yarn I had left. I know I'm gifted. So that can go in the garbage and this is good to go.
And this is my new bag, and please enjoy and hopefully that we can see your bags available to on our social media. We'll see you again real soon. It's Mikey on behalf of Yarnspirations as well as The Crochet Crowd. Bye, bye ..
No comments:
Post a Comment